Telnet to Port 25 to Test Smtp Communication
We are reader supported and may receive a commission when you make purchases using the links on our site
How to Test an SMTP Server with Telnet
You will find a lot of pages on the web that explain how to connect to your mail server through Telnet. Most of them are wrong. This is how to do it.
@VPN_News October 17, 2020

One way to test your mail server is to connect to it through a Telnet session rather than through an email client. If you can send an email directly from the mail server's operating system and it actually arrives at its intended destination, then your email system troubleshooting has at least confirmed that you have the right mail server address, the right username, and the right password.
So, if you can't get your email client to send any mails, then the problem lies with your client.
By confirming all of the details that you have for your mail server by logging into it directly with Telnet, you narrow down the source of your email problems.
Getting Telnet
Telnet is available in Windows 10 but it isn't activated. To get Telnet operating:
1. Type Telnet into the search field in the toolbar at the bottom of your desktop.

2. Click on Turn Windows features on or off. This opens a pop-up window.
3. Scroll down to Telnet Client, check the box next to it and press the OK button.
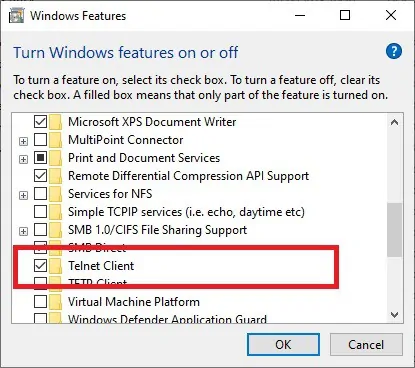
A progress window will appear and show the process of installation for Telnet. Once the installation has finished, the window will close.
4. Type Telnet into the search box again.
This time you will see the Telnet utility appear as the best match for your search. Click on this option to open a Telnet Window.
The command prompt in the Telnet window should display Microsoft Telnet>.
Gather required information
You need the following information from your email or web host in order to proceed:
- Email server name – this will be listed as the Outgoing Server in your Email settings within your hosting plan.
- Email account – if you haven't set up an email account yet within your hosting service, do that now.
- Account password – if you can't remember the password you gave for your email account, reset it.
Note down these three pieces of information.
You need to convert your username and password into the Base64 format in order to pass the authentication phase of the test.
1. Go to base64encode.org in order to convert your credentials.
2. Enter your email address in the top field of the web page.
3. Press the Encode button.
You will see the encoded version of your address in the bottom field of the screen.
4. Open another tab and surf to the same website again.
5. Enter your password this time to get its encoded version.
As the Telnet window doesn't stretch across the screen, you can overlay that window over each tab for your email address and password so you can see the encoded results of each value as you type them in. That has less risk of transposition error than writing down the encoded values on a piece of paper.
Connecting to your mail server
Telnet will use port 23 by default if you don't enter a port number at the end of the open command. Port 23 won't get you into your SMTP server.
SMTP uses three ports: 25, 465, and 587. All of the other advice pages on the web that include tips on how to access SNMP with Telnet tell you to use port 25. However, I tried that with three different SMTP servers and it didn't get me in. I also couldn't get into any SMTP server with port 465. Port 587, however, works.
In this example, the mail server name in the screenshot is mail.alljewelrycenter.com. When you copy these commands, replace that email server name with the name of your email server. Also where you see values in angle brackets (<>) replace those with your own information – including deleting the angle brackets.
1. Open a connection to the mail server.
2. Enter open <your_mail_server_name> 587 and press Return.
Once you are in the environment for the mail server, Backspace and Delete do not work. It also isn't possible to paste values into the screen, which is unfortunate because getting the SMTP server to accept your instructions requires you to type in those Base64 values. If you make a mistake, press Return and start again.
Sending an email
1. Enter EHLO <your_domain_name> and press Return.
2. Enter AUTH LOGIN and press Return.
3. Now you need to enter the Base64 version of your email address without making any mistakes. Press Return.
4. Enter the Base64 version of your password and press Return.
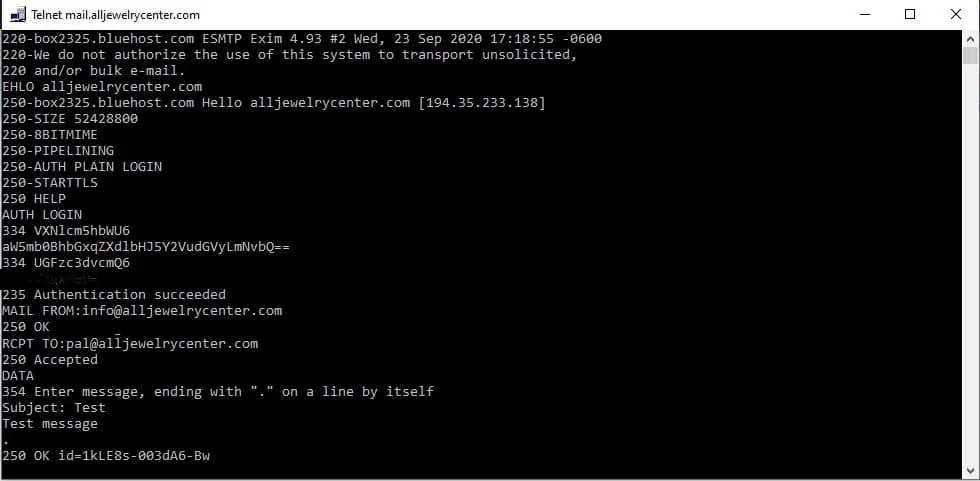
Hopefully, you will see the message: 235 Authentication succeeded.
5. Enter MAIL FROM:<your_email_address> and press Return.
You should see the message: 250 OK.
6. Enter RCPT TO:<destination_email_address> and press Return.
You will see the message: 250 Accepted.
7. Enter DATA and press Return.
8. Enter Subject: Test and press Return.
9. Enter Test message and press Return.
10. Enter . and press Return.
Note: A full stop on a line by itself is the signal to the SNMP server that input has ended.
You will see the message OK followed by an ID code. Your email has been sent. You can see a screenshot of a successful SMTP test below.
11. Check the Inbox of the email account that you sent the email to in order to confirm that the process worked.
You will notice that the email doesn't have a sender's email address in it.
12. Go back to the Telnet window, enter quit to close down the connection to the SMTP server, and then enter quit to close the Telnet window.
Troubleshooting email setup
If you get to the end of the test, then you know there is nothing wrong with your email server or the address and credentials that you have noted down in order to get access to it.
If the SMTP server gave you an error message that the origin email address wasn't valid, that could be because you wrote it down wrong. It could also mean there is something wrong with your email account and that could be the reason that you can't get it to work in your new email client.
Hopefully, carrying out a test of your SMTP server through Telnet away from your new email client will help you narrow down all the potential reasons for any email problems that you are experiencing.
Telnet to Port 25 to Test Smtp Communication
Source: https://www.comparitech.com/net-admin/telnet-smtp-test/
0 Response to "Telnet to Port 25 to Test Smtp Communication"
Post a Comment